Let's start with the fact that there's no muscle by the name "hip flexor"; there are several muscles around the front of the hip whose main action is to flex the hip - hence, we call them "hip flexors."
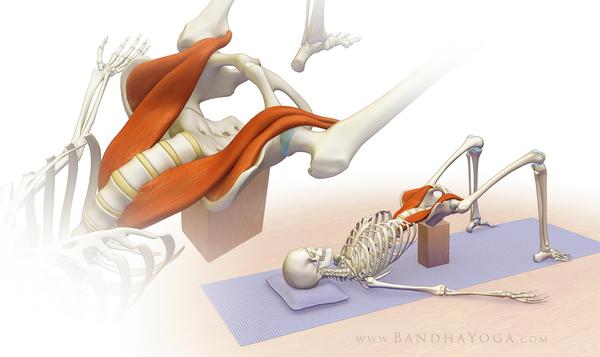
The longer of the two that you
see on the picture is called Psoas Major - that's EXACTLY what we've been working on for the last little while. And, of course, it is easy to see on the picture that this very long Psoas Major actually attaches our legs right to our spine.
When this guy is short (or lob-sided) - and for many of us it is simply due to the amount of sitting we do - it applies all sorts of forces to our spine and
our rib cage. This is why opening the front of the hips can relieve mid-back pain... Magic, right?
More on the Hip Flexor group as well as instructions for the Clam Shell next week.
In the mean time, here is an abbreviated Front Hip Opening sequence from this week:
Step 1: Start with your belly on the core ball.
This will help to down regulate {calm} the nervous system, which, in turn, can help you work the connective tissue without experiencing too much pinching. Global Shear on the ball also helps to
mobilize some of the abdominal muscles and allow for easier access to the hip flexor group.
Options here include side to side rocking, breathing, contract - release, or breath holds.
Step 2: Release the
quads.
Lying on your belly, set a ball {or a ball set} under your front mid - thigh.
Start, as usual, with a few breaths.
From there, options are: stay and breathe (especially if sensations are quite strong); contract - release (tighten the muscles of the quad, then release); flossing (bend and straighten the knee).
Step 3: Work the Hip Flexor Group.
We used a soft ball in that same prone position to massage our hip flexors.
Lying face down, set the ball just to the outside of the pubic bone - right where the thigh connects to your torso {look at the image
above if in doubt} - and roll up along the inside of the pelvis and up toward the belly button.
A word of caution: this area can be very sensitive to work, so if you feel uneasy about Step 3, instead spend more time with Step 2 - giving your nervous system a chance to get accustomed to pressure in this area.
Step 4: Hip Joint Capsule Reset.
Start on hands and knees; then walk your left leg back - so the leg is fully extended behind you, and your left toes are on the mat / floor.
Position your right knee exactly under your right hip, and then load the bulk of your body weight onto that leg. The key here is to align your knee directly
underneath your hip and load the weight over the femur.
Now keeping the weight over the knee, sit your hips back slightly. Imagine that you can drive the top of your femur through the top/side of your butt.
Important reminder: there are no moves / exercises that are right for everyone. If something from above doesn't make sense
leave it out - and bring your question to the class - let's take a look at it together.
Enjoy your weekend!